EDIT: Some people were rightly complaining about the code snippets being screen captures rather than <code> blocks. I’ve updated accordingly.
Also, many have rightfully commented that the code in this post is not realistic and if used in a production environment would be nightmarish for maintainers and likely even for scalability. I didn’t clearly articulate what my intentions were, so I’ll try to do better in this update: I am a proponent of using libraries and frameworks. They allow a developer to “stand on the shoulders of giants” so to speak. This post and the ones that I’m going to publish that build on this are an exploration of which problems frameworks like React/Redux, Angular, Ember, etc. solve by coding myself into those problems and then identifying how different frameworks attempt to solve these problems.
The interwebs are buzzing about React.js and redux and flux and angular and ember and…
It’s rather tiring to try and learn all of these.
I thought that I’d make a parallel post to this post: Building Your First React.js App.
If you want to use React, fine, I am not trying to convince anyone not to. I just want to show that components in a JavaScript application are quite simple to do and do not require any framework at all to do so.
The concept is to follow the MVC pattern. Where the Models are being observed by the Views which are observed by the Controllers. A user interacts with a View, that event is handled by the Controller which updates the Model accordingly. The View observes the Model and handles those events by rendering itself accordingly. In the aforementioned post, there is no controller, nor events. So I’m going to keep my example as simplistic as the one provided. In a future post, I plan on expanding this idea example to utilize Models and Controllers.
Below is my parallel universe version of Per Harald Borgen’s post:
This article will take you through every step of building the simplest JavaScript app possible. Even simpler than a to-do list.
Why so simple? Because I’ve found that when I’m trying to learn a new technology, even the simplest features can add unnecessary complexity.
If you’re overwhelmed with the wide variety of frameworks and libraries being published, this tutorial is for you.
There are no prerequisites other than basic JavaScript skills. Though if you’d like to read some basic theory before getting started with the coding, you can read the article below and then return.
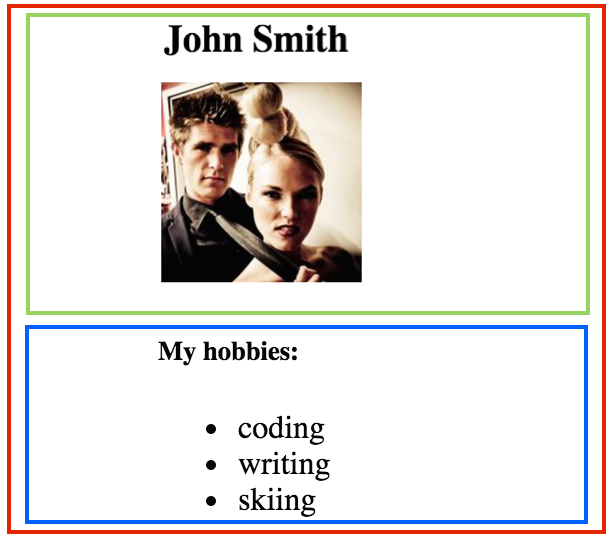
Looking at the final project
To claim you’ll be building an app is actually an exaggeration. It’s only a profile page, as you can see below. (The image is taken randomly from http://lorempixel.com/)
Step 1: Splitting the page into components
An application is built around components; everything you see on the screen is a part of a View component. Before we start coding, it’s a good idea to create a sketch of the views, as we’ve done above.
The main component — which wrap all other components — is marked in red. Since we’re targeting this application to run in a browser, we’ll call this one document.body or Body.
Once we’ve figured out that Body is our main viewport, we’ll need to ask ourselves: which view is a direct child of the Body?
I’d argue that the name and the profile image can be grouped into one View, which we’ll call Profile (green rectangle), and the Hobbies section can be another View (blue rectangle).
The structure of our components can also be visualized like this:
- Body
    - Profile
    - Hobbies
We could split the Views further; like ProfileImage and HobbyItem, though we’ll stop here for the sake of simplicity.
Step 2: Hello World
Before you begin coding, you’ll need to download the source file. It’s available at this GitLab repo. Simply copy or clone it and open the index.html file in the browser. (The full code is available in the finished_project.html file.)
I’ve setup the file properly, so you’ll see no links to any unnecessary libraries in the <head/> section of the file. Your code will start at line 9.
For a proper JavaScript project, you wouldn’t use this non-minified setup. But I don’t want this tutorial to be about anything else than coding, so we’ll keep it simple.
Let’s write our first View:
var App = {};

App.View = (function () { //the View component - a 'class library' of views
    var _library = {
        Hello: (function () {
            var _private = {
                div: document.createElement('div')
                },
                _public = {
                    render: function (container) {
                        _private.div.appendChild(document.createTextNode('Hello World'));
                        container.appendChild(_private.div);
                    }
                };
            return _public;
        })()
    };
    return _library;
})();
As you can see on the first line, we created an object namespace called App. We then created a View object as a component to house all of the views that are going to be in our application. Finally, we declare the Hello object using the Definitive Module Pattern and the Immediately Invoked Function Expression.
Each View object can have as many members you want, though the most important one is the render method. In the render method, you’ll pass in a reference to the DOM element that will contain the output of this view and then append the contents of the view to that container. In our case, we simply want a div tag with the text “Hello World”.
Then follow up with this inside the App object:
var App = {
    main: (function () {
        window.addEventListener('load', function () {
            App.View.Hello.render(document.body);
        });
    })()
};
This is how we specify where on the page we want the Hello view to be rendered. This is done by adding a load event handler to the window that calls Hello.render, passing in the document.body as the container parameter. I throw this into a function called main, but that is just a convention that I use due to familiarity with C-based programming languages.
The syntax shouldn’t look too weird, we’re just declaring an object that utilizes the DOM API and adhering to a couple of tried and tested software development patterns.
Load the page in a browser and you’ll see ‘Hello World’ printed out on the screen.
Step 3: More components
Let’s add some more views. Looking back at our application overview, we see that the App component has got two views called Profile and Hobbies.
Let’s write out these two views. We’ll begin with Profile:
Profile (function () {
    var _private = {
        div: document.createElement('div'),
        heading: document.createElement('h3'),
        img: document.createElement('img')
    },
    _public = {
        element: _private.div,
        render: function (container) {
            _private.heading.appendChild(document.createTextNode('My name'));
            _private.img.setAttribute('src', 'example.jpg');
            container.appendChild(_private.div);
        }
    };
    _private.div.appendChild(_private.heading);
    _private.div.appendChild(_private.img);
    return _public;
})(),
There is actually nothing new here. Just a bit more content in the render function than it was in the Hello view.
Let’s write the Hobbies component:
Hobbies (function () {
    var _private = {
        div: document.createElement('div'),
        heading: document.createElement('h5')
    },
    _public = {
        render: function (container) {
            container.appendChild(_private.div);
        }
    };
    _private.heading.appendChild(document.createTextNode('My hobbies:'));
    _private.div.appendChild(_private.heading);
    return _public;
})()
If you refresh the page again though, you won’t see any of these components.
This is because nothing has told these views to render to the screen. We need to update our main function to render the Profile and Hobbies view instead of the Hello view.
This is what we’ll need to do:
var App = {
    main: (function () {
        window.addEventListener('load', function () {
            App.View.Profile.render(document.body);
            App.View.Hobbies.render(document.body);
        });
    })()
};
If you refresh the page again you’ll see that all the content appears on the page. (Though the image wont appear, as we’ve only added a dummy link to it).
Step 4: Get the data
Now that we have the basic structure setup, we’re ready to add the correct data to our project.
A good practice when implementing the MVC pattern is something called a one directional data flow, meaning that the data is passed down from parent to child components.
Above all the components, paste in the following code:
var DATA = {
    name: 'John Smith',
    imgURL: 'http://lorempixel.com/200/200/',
    hobbyList: ['coding', 'writing', 'skiing']
}
You can imagine this data being fetched from an API of something.
The next thing you’ll need to do is add this data to the App components as its model.
Data in the MVC pattern is maintained in the Model objects and mutated by the Controller objects. In this simplistic example, I’m going to overlook that aspect and just deal with the single object. In a future post, I’ll explore a more complex data model for the application.
Below, you’ll see how you pass the data into the views, by simply changing the constructor method of the views to accept a model, we’ll initialize our view objects and then render them.
var App = {
    main: (function () {
        window.addEventListener('load', function () {
            var profile = new App.View.Profile(DATA),
                hobbies = new App.View.Hobbies(DATA);
            profile.render(document.body);
            hobbies.render(profile.element);
        });
    })()
};
There’s no new syntax, no new Domain Specific Language, just plain old JavaScript.
Now we’re able to access this data from within the View objects through model.[member-name]. We’ll also restructure the views a bit to make the Hobbies a child of the Profile view. This makes it so the application just initializes an instance of the Profile view and data is where it needs to be.
We use the profileImage and name in the Profile view while only the hobbyList array is passed into the Hobbies view. This is because the Hobbies component doesn’t need the rest of the data; it’s simply going to display a list of hobbies.
Let’s look at how we’ll need to rewrite the Profile view in order to use the data we’ve passed down to it:
Profile: function (model) {
             var _private = {
                     div: document.createElement('div'),
                     heading: document.createElement('h3'),
                     img: document.createElement('img'),
                     hobbies: new App.View.Hobbies(model.hobbyList)
                 },
                 _public = {
                     render: function (container) {
                         _private.heading.appendChild(document.createTextNode(model.name));
                         _private.img.setAttribute('src', model.imgURL);
                         _private.hobbies.render(_private.div);
                         container.appendChild(_private.div);
                     }
                 };
             _private.div.appendChild(_private.heading);
             _private.div.appendChild(_private.img);
             _private.div.appendChild(_private.hobbies.element);
             return _public;
         },
I removed the IIFE pattern and added the Hobbies view to the Profile‘s members. Then access the members of the passed in model in order to present the resource’s current state to the user.
In the Hobbies component we’ll need to use a technique for looping through the of hobbies.
Hobbies: function (model) {
             var _private = {
                     div: document.createElement('div'),
                     heading: document.createElement('h5'),
                     list: document.createElement('ul')
                 },
                 _public = {
                     element: _private.div,
                     render: function (container) {
                                 model.map(function (hobby) {
                                     var li = document.createElement('li');
                                     li.appendChild(document.createTextNode(hobby));
                                     _private.list.appendChild(li);
                                 });
                                 _private.div.appendChild(_private.list);
                                 container.appendChild(_private.div);
                             }
                 };
             _private.heading.appendChild(document.createTextNode('My hobbies:'));
             _private.div.appendChild(_private.heading);
             return _public;
         }
As you can see, we’re looping through the hobbies array stored in model. We’re using the array prototype method map, which creates a new array based on whatever we return within the callback function.
Notice that I didn’t create a key attribute on the list items. There is no reason to at this point in the development of this application as nothing outside of the Hobbies view is concerned with this list of data as it is presented on the screen.
This is the full code:
<!DOCTYPE html>
<html>
<head>
<meta charset='utf-8'>
<title>Your First JavaScript Project</title>
</head>
type="text/javascript">
/*Add your application code here*/
var DATA = {
    name: 'John Smith',
    imgURL: 'http://lorempixel.com/100/100/',
    hobbyList: ['coding', 'writing', 'skiing']
};

var App = {
    main: (function () {
        window.addEventListener('load', function () {
            var profile = new App.View.Profile(DATA);
            profile.render(document.body);
        });
    })()
};

App.View = (function () { //the View 'class' library component
    var _library = {
            Profile: function (model) {
                         var _private = {
                                 div: document.createElement('div'),
                                 heading: document.createElement('h3'),
                                 img: document.createElement('img'),
                                 hobbies: new App.View.Hobbies(model.hobbyList)
                             },
                             _public = {
                                 render: function (container) {
                                             _private.heading.appendChild(document.createTextNode(model.name));
                                             _private.img.setAttribute('src', model.imgURL);
                                             _private.hobbies.render(_private.div);
                                             container.appendChild(_private.div);
                                         }
                             };
                         _private.div.appendChild(_private.heading);
                         _private.div.appendChild(_private.img);
                         _private.div.appendChild(_private.hobbies.element);
                         return _public;
                     },
            Hobbies: function (model) {
                         var _private = {
                                 div: document.createElement('div'),
                                 heading: document.createElement('h5'),
                                 list: document.createElement('ul')
                             },
                             _public = {
                                 element: _private.div,
                                 render: function (container) {
                                             model.map(function (hobby) {
                                                 var li = document.createElement('li');
                                                 li.appendChild(document.createTextNode(hobby));
                                                 _private.list.appendChild(li);
                                             });
                                             _private.div.appendChild(_private.list);
                                             container.appendChild(_private.div);
                                         }
                             };
                         _private.heading.appendChild(document.createTextNode('My hobbies:'));
                         _private.div.appendChild(_private.heading);
                         return _public;
                     }
        };
    return _library;
})();

</html>

This is a good example of a very good design pattern to solve a problem. However, when the components of the frontpage are more complex you are going to scale the problem to the next level. This is where a framework comes in. A good example would be implementing a login system and navigation bar.
LikeLiked by 1 person
Why are you using Array.prototype.map() instead of Array.prototype.forEach()? Other than that, nice 🙂
LikeLike
Because I’m a lazy coder that was basing my code off of another’s post. You’re right, forEach is more applicable method to use in this situation.
LikeLike
One reason for using map over forEach is the latter mutates the array, whereas map does not mutate the original array. In essence, .map offers no side effects.
LikeLike
I don’t see how forEach creates the possibility for side effects any more than map does.
LikeLike
Great. You have created your own framework from scratch and used it to build a simple webpage. Now use it to build a large, responsive, cross platform app and hire a team who’s familiar with it and knows how to get the best out of it.
LikeLiked by 3 people
[…] From: https://pseudoconcurrentthought.wordpress.com/2016/01/26/my-reaction-to-react/ […]
LikeLike
nice one, im subscribing rss for more
LikeLike
Now update `DATA`. What happens?
LikeLiked by 1 person
That is the basic premise of the next post. It requires a significant refactoring of the View objects and introduces a Controller object as well as a set of internal Model objects that the DATA will be mapped to. It also begins to identify some of the problems that the various frameworks are attempting to address.
LikeLike
I have to point a *huge* difference with React : your “render” functions seem to do actual DOM manipulation.
Which means, passed the initial render, you’re not behaving *at all* in a similar way.
If all your TODO app is going to do is a one-time rendering, then doing it on the client *at all* is an overkill.
Are you planning on exploring “what happens when data is updated from the server” or “how to deal with re-rendering” in a later post ?
Thanks
LikeLike
Screenshots with black background are ilegible on my Mac.
LikeLike
Great but this is why react is great : https://facebook.github.io/react/docs/advanced-performance.html
LikeLike
For me it is quite difficult to follow the code shots because both the color scheme is really, really awkward for me. Why is it so popular among coders to have these dark themes in place? Perhaps in dark rooms this would be adequate but only at night I can get darkness.
LikeLiked by 1 person
I like the dark themes because staring at a bright white screen all day makes my eyes hurt. I’ve updated the post to use
blocks instead of the screenshots, so it should be easier on the eyes now.LikeLiked by 1 person
With this post, you’re showing that a solid understanding of the basics matters more than mastering frameworks. Thanks for that ! It’s really a great post !
LikeLike
I think its a very good example of the power of javascript, and every newcomer in the crazy world have to see the articles like this.
LikeLike
React is not an MVC framework.
React has the virtual DOM feature for faster rendering when state changes.
Point is, you didn’t replace React. You made a very simple MVC example using vanilla JS.
LikeLike
> If you want to use React, fine, I am not trying to convince anyone not to. I just want to show that components in a JavaScript application are quite simple to do and do not require any framework at all to do so.
Sorry but the code proves otherwise, it looks like a mess compared to JSX, and doesn’t look like it’ll be easy to maintain. Add to that the fact that React has automatic and optimized re-rendering on state change, I don’t see why anyone would try and replace React with vanilla JS other than as an exercise.
LikeLike
I stopped reading, when saw the first source example. Please change the color scheme to something more readable.
LikeLike
Code examples have been changed to be more readable. Also, the full code is available at https://gitlab.com/pct/YourFirstJavaScriptProject/tree/master
LikeLike
Hello there, just became aware of your blog through Google, and
found that it’s really informative. I am going
to watch out for brussels. I will be grateful if you continue this in future.
Lots of people will be benefited from your writing.
Cheers!
LikeLike
why does every variable start with an underscore, that just seems unnecessary…
LikeLike
Old habits die hard…it used to be the way to differentiate between a public and a private member/variable.
For the private and public collections in the Definitive Module Pattern, those two are reserved keywords, so to use those labels without the underscore would be problematic. I suppose “enclosed” and “external” could be used, but I was trying to convey the intent of those as being similar to access modifiers from other languages.
LikeLike
This post does not even come close to the realm of current client-side frameworks, I don’t even see the point in mentioning React at all. It is just a convoluted way to append nodes to the page. You are at the base of a very very tall mountain – templating, events, user input, state management, navigation support, UI updates, animation, persistence, remote data – only after all of that the approaches used by react (nested components, dom diffing, jsx) start to make sense. You have a long road ahead.
LikeLike
[…] My Reaction to React pseudoconcurrentthought […]
LikeLike
Well, good luck with optimal reconsilation of the view inside a large app. That’s one of React’s biggest strengths.
LikeLike
Thanks! I want to learn C, now.
LikeLike
[…] Моя реакция на React (My Reaction to React) […]
LikeLike
[…] Une introduction à React. […]
LikeLike
[…] Моя реакция на React (My Reaction to React) […]
LikeLike